
現在Steamで早期アクセスゲームとして配信されているValheim。
Prepare for a feast! The Bog Witch is now available in the #Valheim PTB – what kind of potions will you brew? 🧹 Patch notes available on our website: https://t.co/0UwYxOY1LB pic.twitter.com/bJmIHvi4KM
— Valheim 🌟 (@Valheimgame) October 15, 2024
Valheim、北欧神話の世界を舞台にしたオープンワールドサバイバルゲームです。プレイヤーは美しい自然環境を探索し、資源を集めて武器や建築物をクラフトしながら生き抜きます。
Valheimはマルチプレイにも対応しており、フレンドと協力してのボスモンスター討伐や大規模建築などを楽しむことができ、ユーザーの間で大きな盛り上がりを見せています。
今回はそんなValheimで自分のPCをサーバーにしてマルチプレイする方法を解説します。
自分のPCをサーバーにすることで費用を掛けずに手軽にマルチプレイを楽しむことができますので、是非参考にしてみてください。
Valheimとは?

『Valheim』は、北欧神話の世界をテーマにした人気のオープンワールドサバイバルゲームです。
2021年にSteamでリリースされ、瞬く間に多くのプレイヤーの支持を集めました。プレイヤーはヴァルハラへの道を目指す戦士として、神秘的な北欧の世界に降り立ち、資源を集めて生活基盤を築き、さまざまな敵と戦いながら成長していきます。
ゲーム内の環境は豊かで、深い森、広大な海、厳しい山岳地帯といったさまざまなエリアが広がっています。プレイヤーは探索とクラフトを通じて拠点を築き、防具や武器を強化し、強力なボスに挑戦することが主な目的です。
北欧神話の影響を受けた世界観は美しく、シンプルながらも魅力的なビジュアルと没入感のあるサウンドデザインがプレイヤーを引き込んでくれます。
Valheimのマルチプレイでできること

『Valheim』は、最大10人までのマルチプレイが可能で、友人と協力してサバイバルを楽しむことができます。マルチプレイでの楽しみ方は、ソロプレイと比べてさらに広がります。
プレイヤーは一緒に広大な世界を探索し、資源を共有し、より効率的に建築や装備の強化を行えます。また、難易度の高いボスに挑戦する際には、役割分担をして戦略的に戦うことが可能です。
チームワークが鍵となる場面が多く、友人と連携することで新たな戦術が生まれ、サバイバル生活において多彩な戦略を立てられる点も魅力です。
例えば、一人が資源収集に集中し、他のメンバーが拠点を守るといった役割分担で効率的に進行できます。また、ゲーム内の建築要素を活用して、友人と一緒に大規模な村や城を建設することもできるため、自由度の高い共同プレイが可能です。
Valheim自宅サーバーとレンタルサーバーの違いは?
Valheimでマルチプレイをする方法として自宅の自分のPCをサーバーにする方法とレンタルサーバーを利用する方法の2つがあります。
これらの違いについて解説します。
自分のPCをサーバーにする方法
『Valheim』では、自分のPCをサーバーとして設定し、友人を招待して一緒に遊ぶことができます。
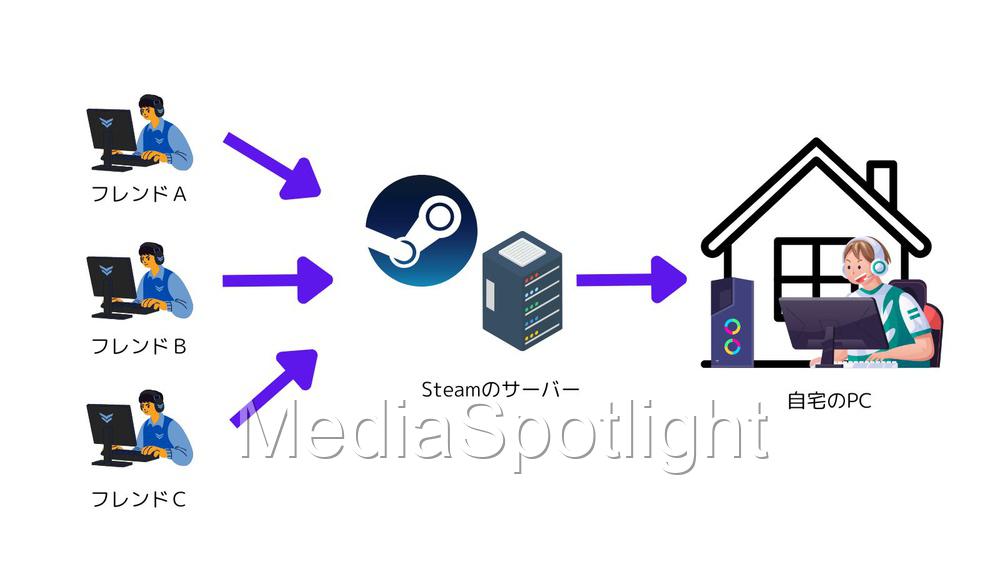
自分のPCをサーバーにする方法は比較的手軽で、ゲーム内の設定からサーバーを立ち上げ、Steamフレンドに招待を送るだけでマルチプレイが可能です。

Steam機能を利用したマルチプレイは無料で始められるのが良いよね
この方法の利点は、追加の費用がかからない点です。しかし、ホストのPC性能がゲームの動作に影響を及ぼすため、推奨スペックを満たすPCを使うことが望ましいです。
また、ホストがオンラインでないと他のプレイヤーは参加できない点も注意が必要です。

フレンドがログインしている間はPCずっと起動してたり、他のことに使えないのが不便・・・
レンタルサーバーを利用する方法
もう一つの方法は、専用のレンタルサーバーを借りて『Valheim』のサーバーとして利用する方法です。
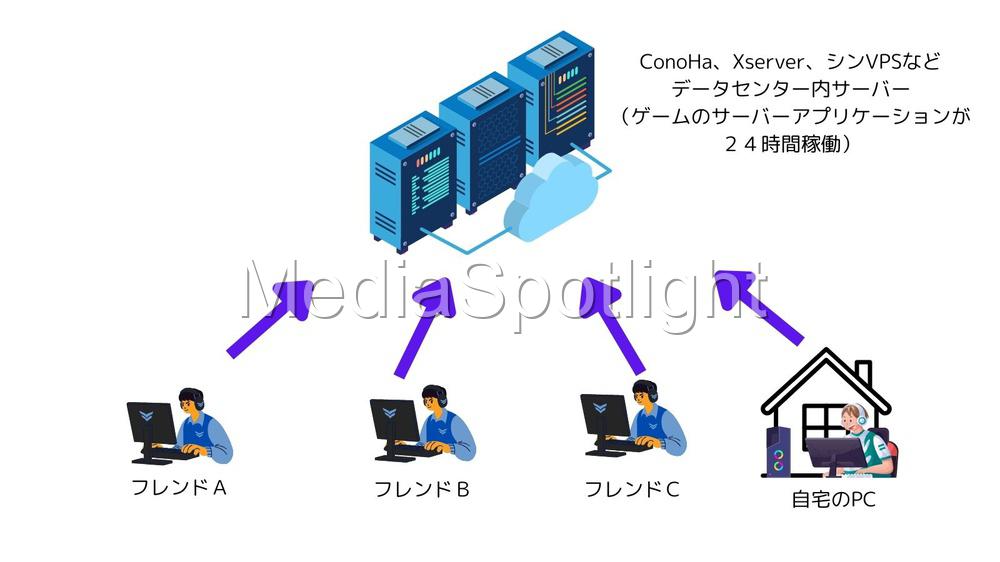
レンタルサーバーを使えば、ホストPCの性能やインターネット接続に影響されることなく、24時間稼働の安定したサーバー環境でプレイできます。

サーバーはずっと稼働してるからみんな好きな時にログインしてプレイできるのがうれしい
さらに、ホストがログアウトしても他のプレイヤーが自由に参加できるため、継続的なゲームプレイが可能です。
レンタルサーバーは手軽に設定できる上に、複数のサービスプロバイダーから提供されており、ゲームに最適化されたプランを選ぶこともできます。

少人数であれば月数百円から借りれるから、自宅PCの電気代とか考えたら意外とお得かも!
費用は発生しますが、大人数で長期間プレイする場合には、安定したプレイ環境を提供する手段として適しています。
Steam機能を利用して自分のPCをサーバーとしてマルチプレイする手順

ここからは実際にSteam機能を利用して自分のPCにフレンドを招待してマルチプレイを行う方法を解説します。
事前準備:Steamのフレンド登録
- ゲームをインストール: サーバーを立てるPCと、参加する側のPCどちらにもプレイしたいゲームをインストールします。
- フレンド登録: マルチプレイを行うには、参加者同士がSteamでフレンド登録をしている必要があります。まだの場合、以下の手順でフレンド登録を行ってください。
招待する側
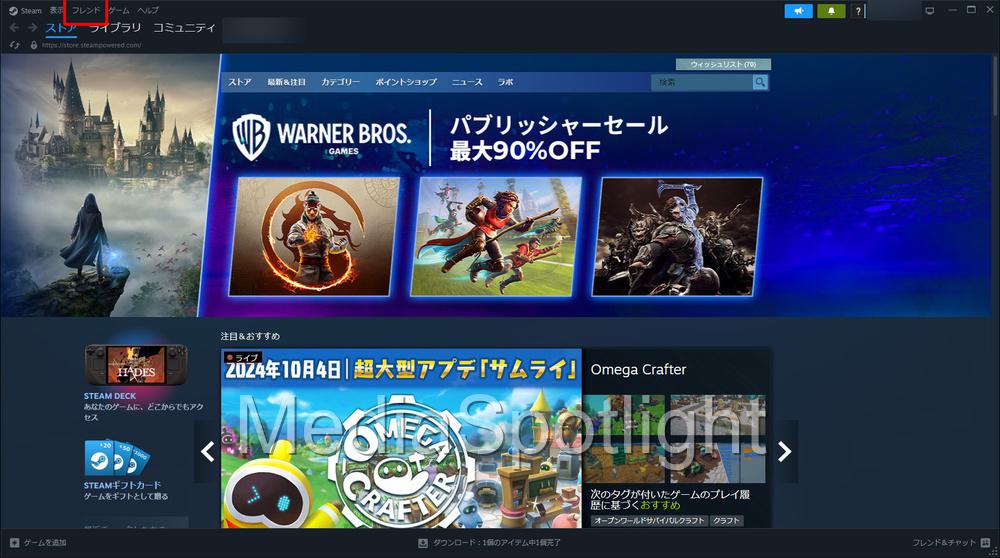
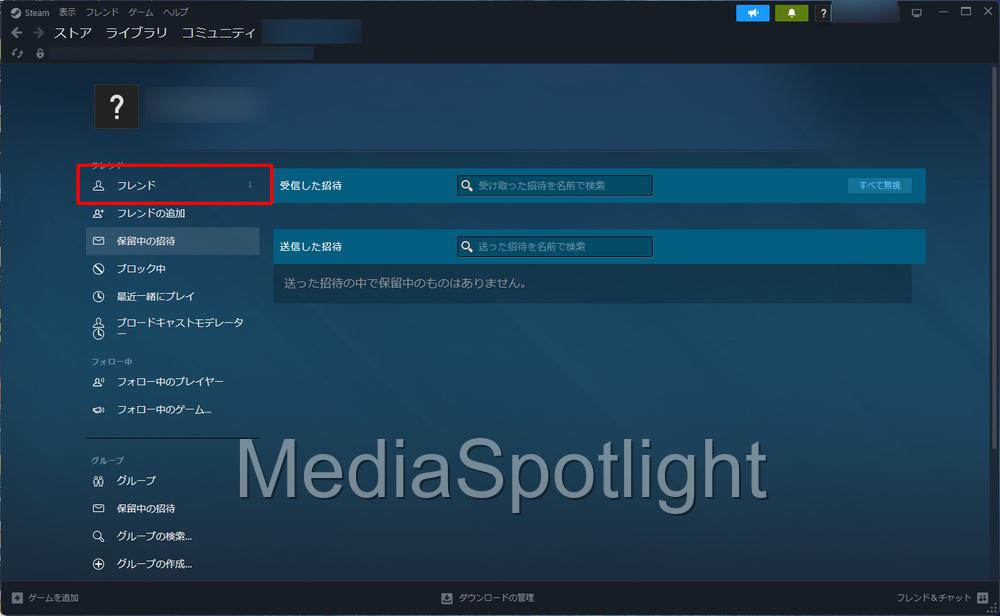
Steamを起動したら画面左上メニューの「フレンド」をクリックします。
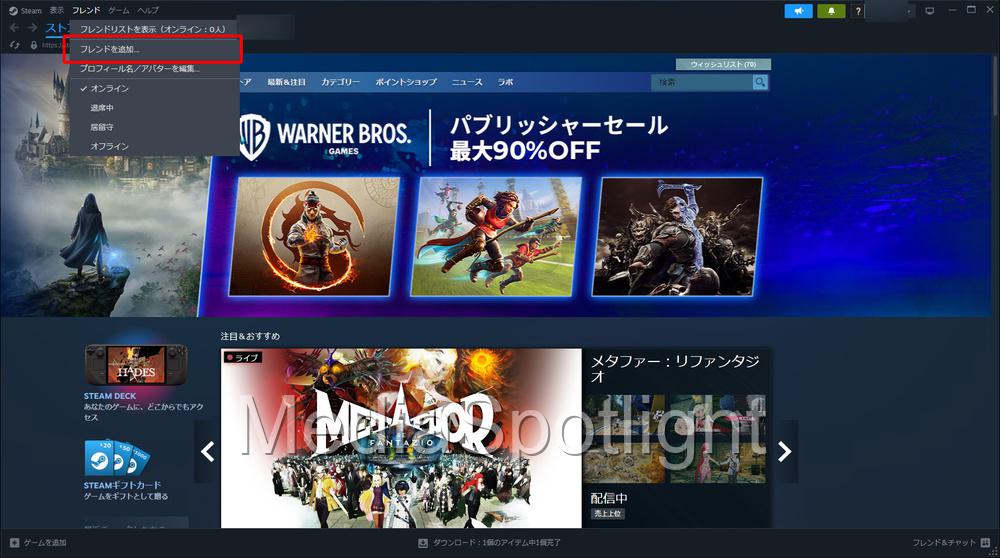
メニューの「フレンドを追加」をクリックします。
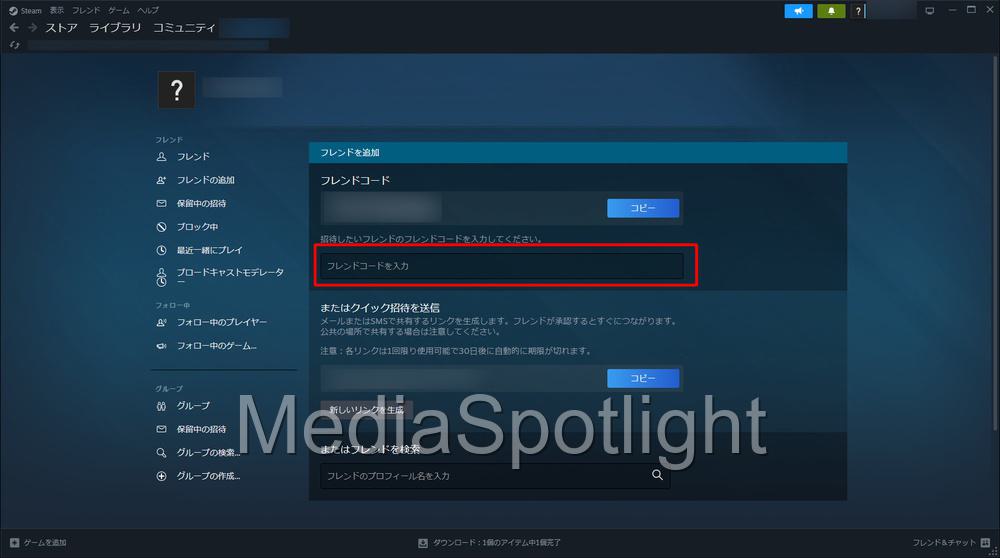
左のメニューから「フレンドの追加」をクリックし、「フレンドコードを入力」の欄に招待したいフレンドのコードを入力します。
招待したいフレンドのIDが表示されたら「招待を送信」をクリックします。
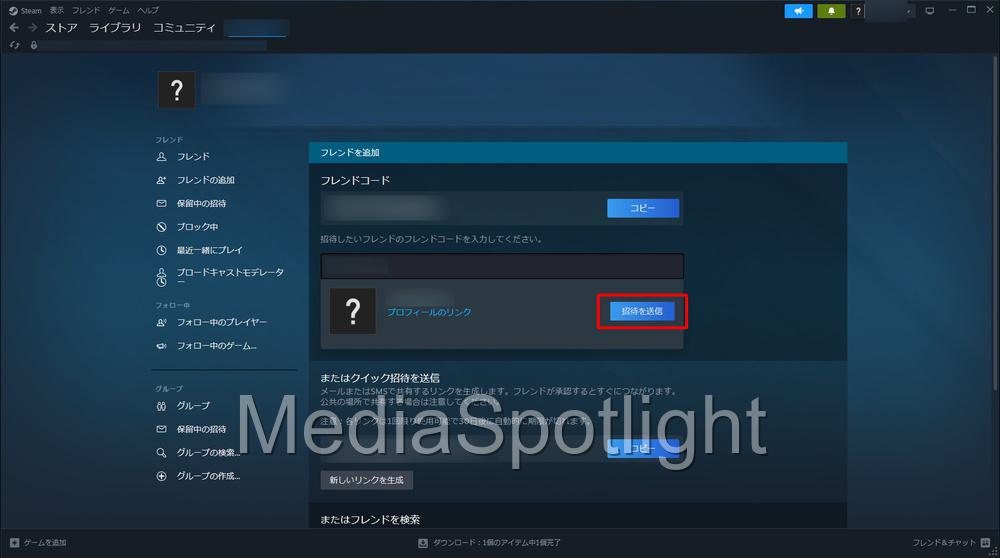
「○○への正体が送信されました!」と表示されたら完了です。

招待される側
招待される側の手順を解説します。
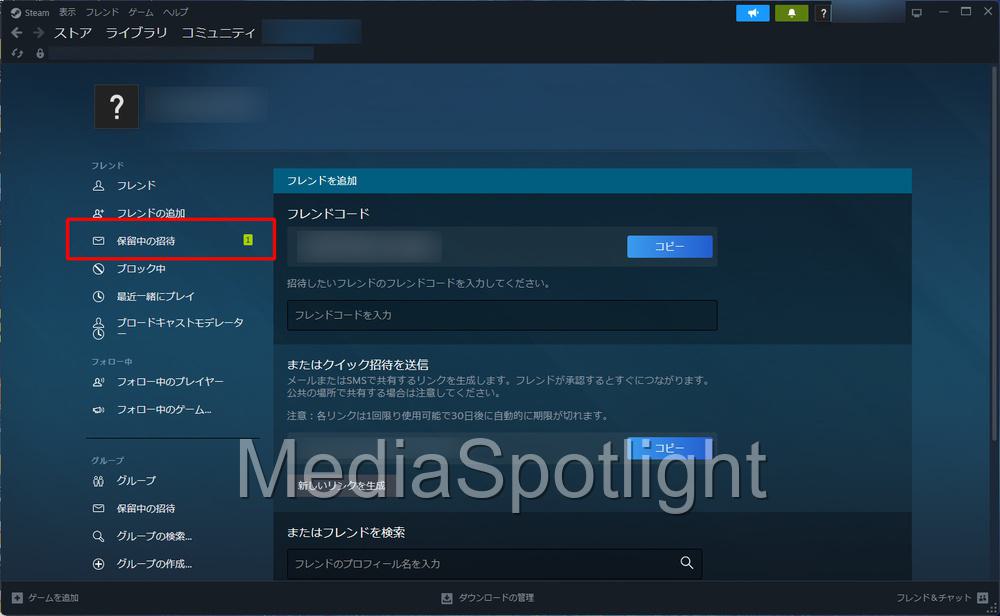
Steamのフレンド画面を開いたら、画面左のメニューの「保留中の招待」に通知が来ているのを確認したらクリックします。
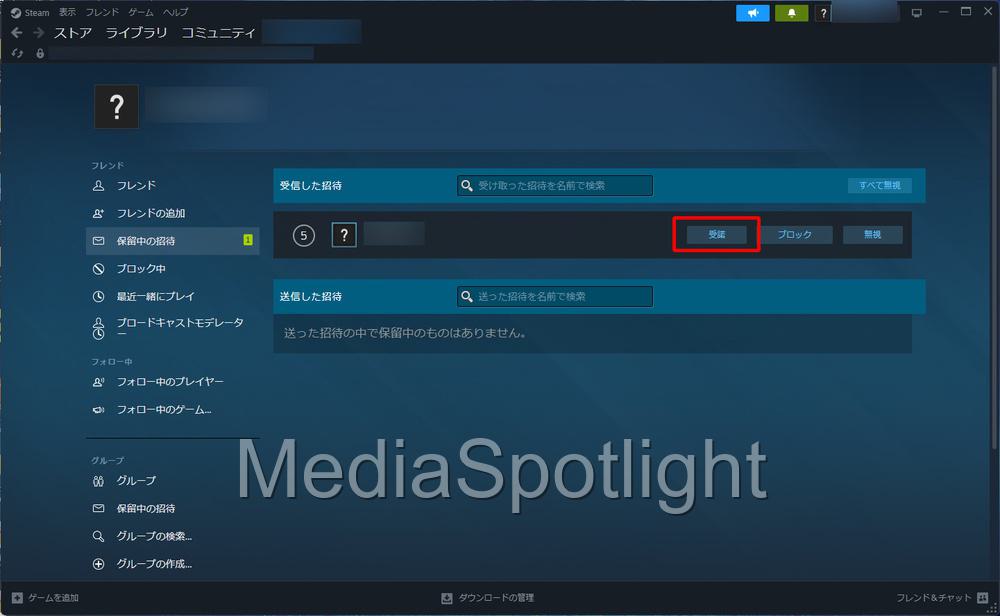
招待を送信してきたユーザーのユーザー名が表示されますので、間違いなければ「受諾」をクリックします。
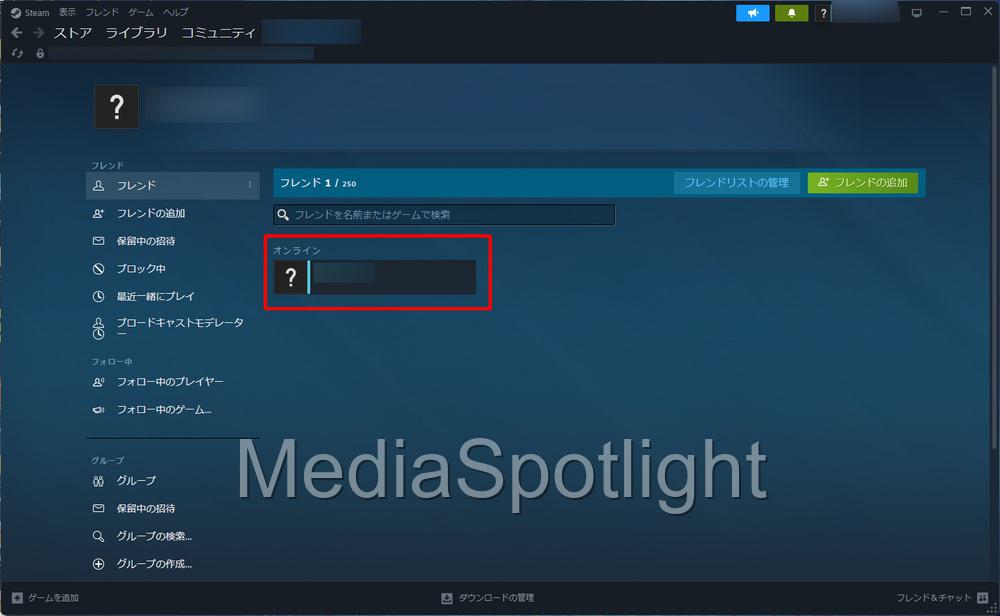
受諾が完了したら画面左メニューの「フレンド」を確認します。
招待してきたフレンド名が表示されていれ登録完了です。
サーバーを立てる側の手順
ここからは実際にマルチプレイを主宰する招待側の手順について解説します。
Valheimを起動したら「ゲーム開始」をクリックします。

キャラクター選択画面で使用したいキャラクターを表示した状態で「スタート」をクリックします。

ワールド選択画面で「サーバー起動」にチェックを入れます。

「コミュニティサーバー」を選択できるようになりますのでチェックを入れ、「サーバーパスワード」を決めて入力します。
ここで入力したサーバーパスワードを招待したいフレンドに通知してください。

「スタート」をクリックします。

ゲームがスタートすると「参加コード」が表示されます。
表示された参加コードを招待したいフレンドに通知してください。

招待される側の手順
主催するプレイヤーのサーバーにログインする招待される側の手順について解説します。
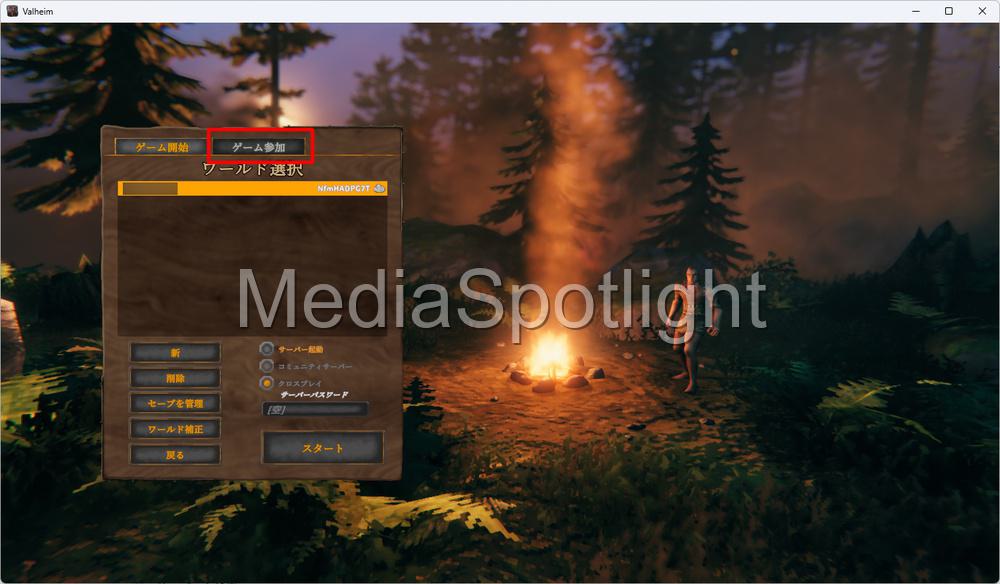
Valheimを起動したら「ゲーム開始」をクリックします。
キャラクター選択画面で使用したいキャラクターを表示した状態で「スタート」をクリックします。

「ゲーム参加」タブをクリックします。
サーバー選択画面で「サーバーを追加」をクリックします。
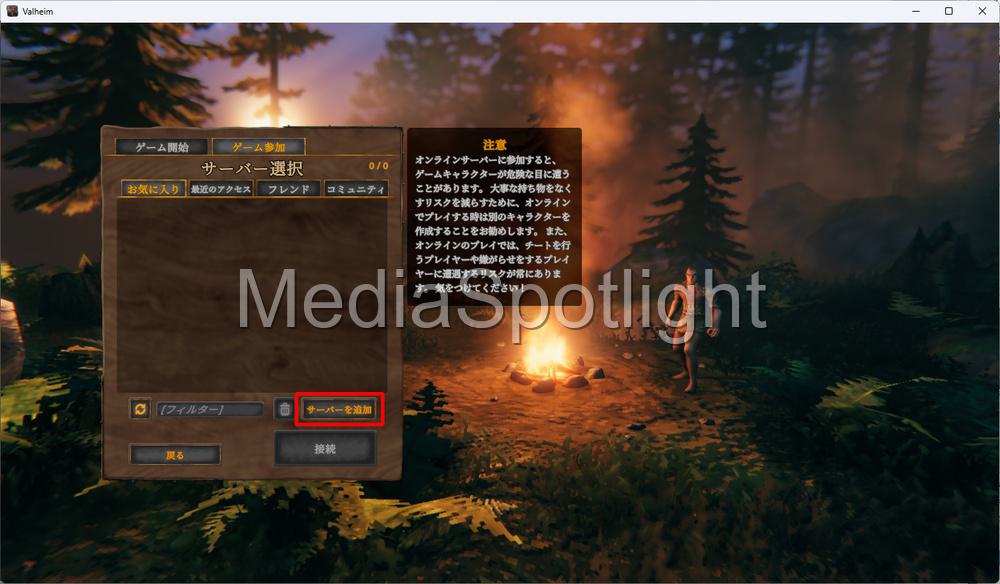
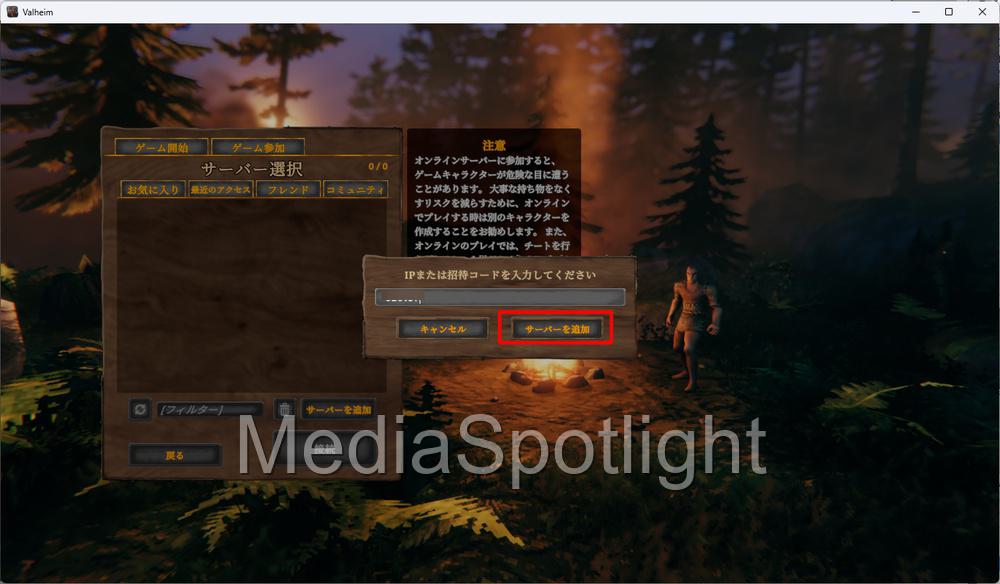
招待される側から通知された「招待コード」を入力します。
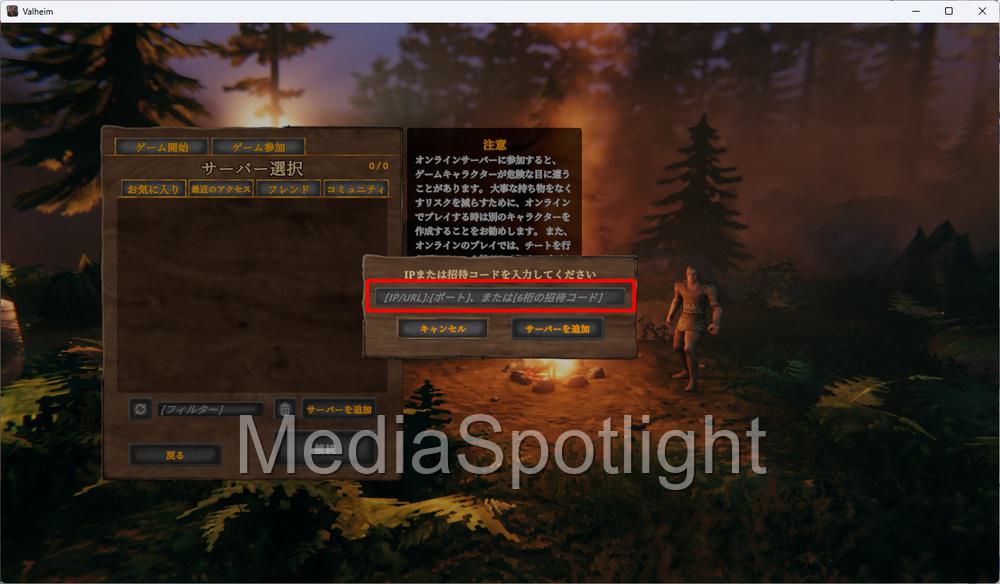
招待コードを入力したら「サーバーの追加」をクリックします。
招待を送ってきたフレンドのサーバーが一覧に表示されたことを確認したら、それを選択します。

「接続」をクリックします。
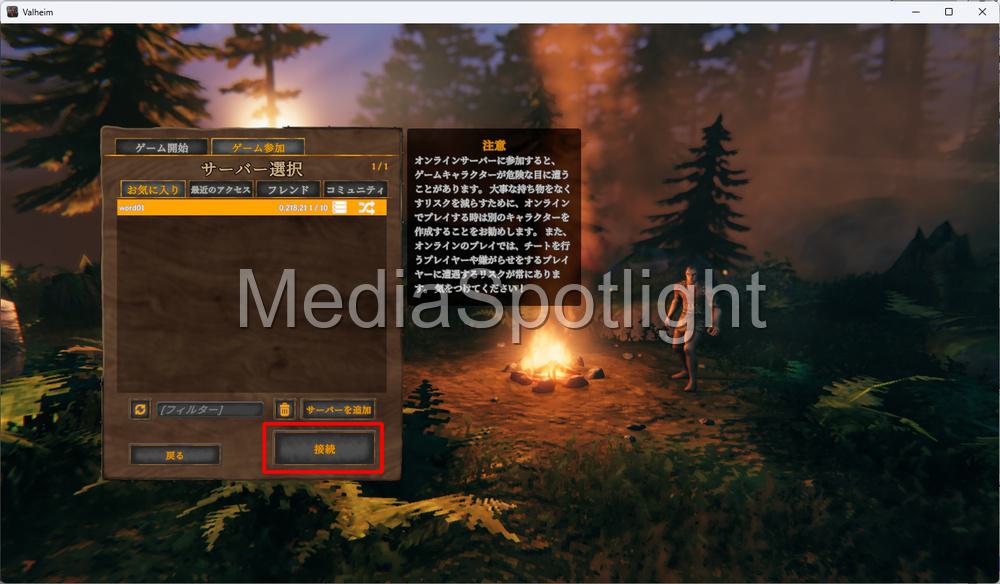
ロード画面が表示されますので待ってください。

パスワード入力ダイアログが表示されたら、招待側から受け取ったパスワードを入力します。

ログインに成功すると以下のようにValheimのフィールド上でフレンドと合流できます。

マルチプレイを楽しんでください。
もし友達とプレイしていて動作が重い、ログインできる時間が合わないなどと感じた方はレンタルサーバーも検討してみてください。

まとめ
今回は人気オープンワールドゲームValheimで、自分のPCをサーバーにしてマルチプレイをする方法について解説しました。
Steamのフレンド機能を使うことで費用を掛けずに手軽にマルチプレイを楽しむことができます。
しかし、本格的なマルチプレイを楽しみたい場合は、PCの性能や稼働時間(電気代)の問題もありますので、ゲーム向けのレンタルサーバーもおすすめです。
それでは、また次の記事でお会いしましょう。


コメント