大人気ゾンビサバイバルゲーム、7Days to Die。
7 Days made the top 100 most played games on Steam Deck and its on Sale Now for 76% Off on the Steam Spring Sale!.https://t.co/6NKGZ4XlnQ
— 7 Days to Die Official (@7DaystoDie) March 15, 2024
今回はConoHa for Gameで7Days to Dieのマルチプレイサーバーのゲームのマルチプレイに関する設定を変更する手順について解説します。
マルチプレイサーバーを運用する上で、マルチプレイに関する設定は重要な要素となりますので是非参考にしてみてください。
また、で7Days to Dieのマルチプレイサーバーを構築する方法についても以下の記事で解説していますので、あわせてご覧ください。
7Days to Dieマルチプレイの設定ファイルの場所は?
serverconfig.xmlファイルの位置(ディレクトリ)
7Days to Dieのマルチプレイサーバーの設定ファイルは、ConoHa for GAMEのサーバーの以下のディレクトリ内に配置されています。
/opt/7dtd/7dtd_serverこちらのディレクトリ内のserverconfig.xmlを編集することで設定を変更できます。
\ Conohaで7Days to Dieのマルチプレイを始める! /
7Days to Dieマルチプレイの設定ファイルの編集方法は?
serverconfig.xmlをサーバー上でエディタを使って直接編集することもできるのですが、正しく編集しないと重大なエラーを引き起こす可能性がありますので、ローカルPCにダウンロードして編集するのがおすすめです。
設定ファイルのダウンロード、アップロードにはWinSCPを使用します。
WinSCPを使ってConoHa for GAMEのサーバーに接続する方法については以下の記事で解説していますので、事前に接続できるところまで確認しておいてください。
serverconfig.xmlをダウンロードする
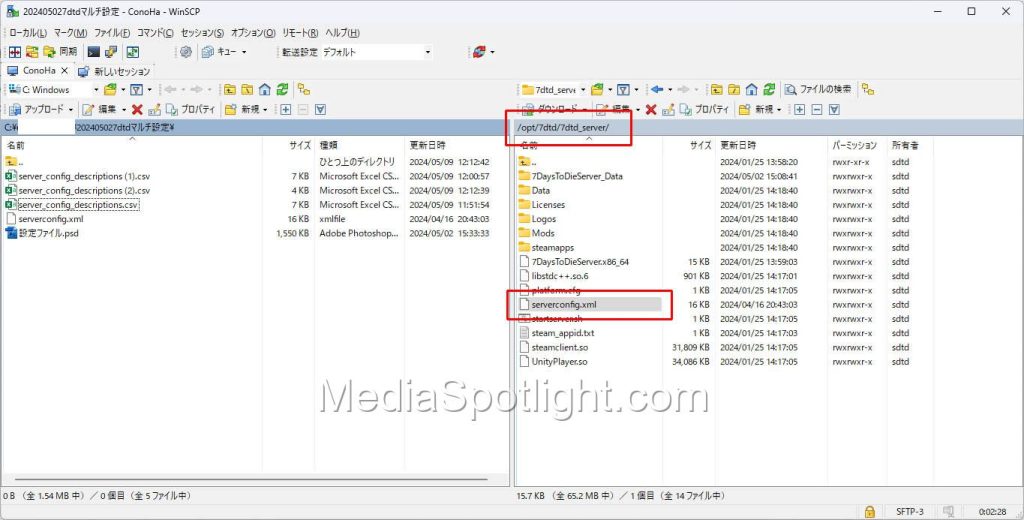
WinSCPを起動してConoHa for GAMEのサーバーに接続したら、serverconfig.xmlのあるディレクトリに移動します。
「7dtd」のフォルダから下の階層に/opt/7dtd/7dtd_server/のディレクトリに移動してください。
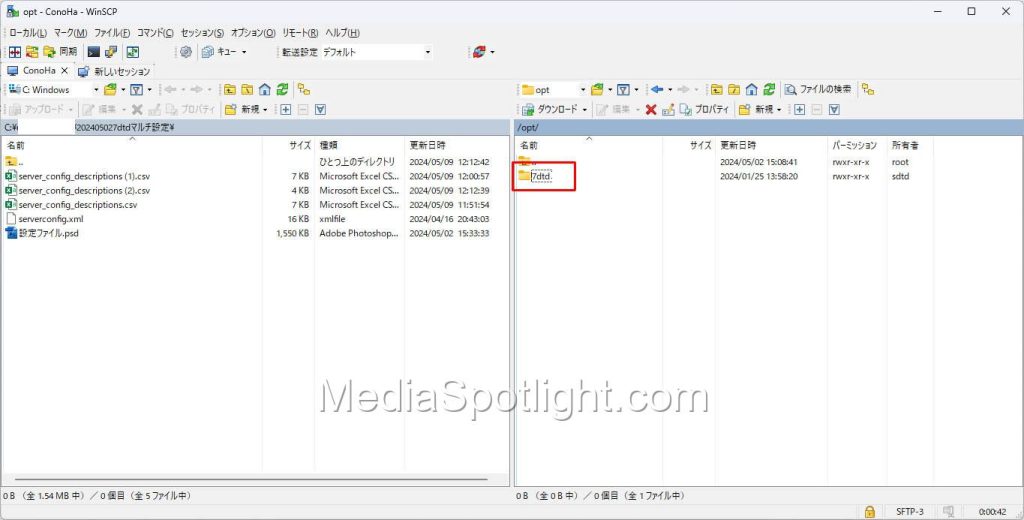
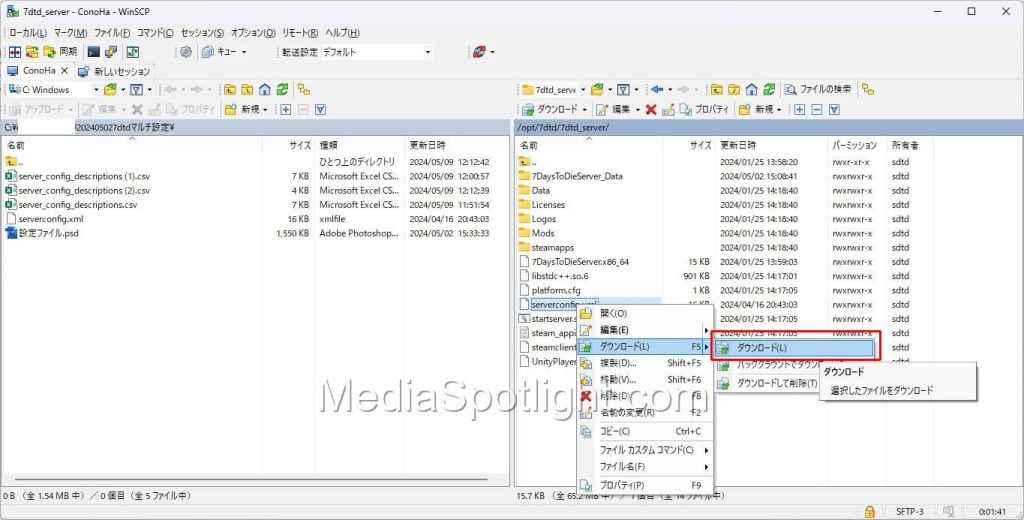
/opt/7dtd/7dtd_serverのディレクトリに移動すると、serverconfig.xmlのファイルがありますので右クリックします。
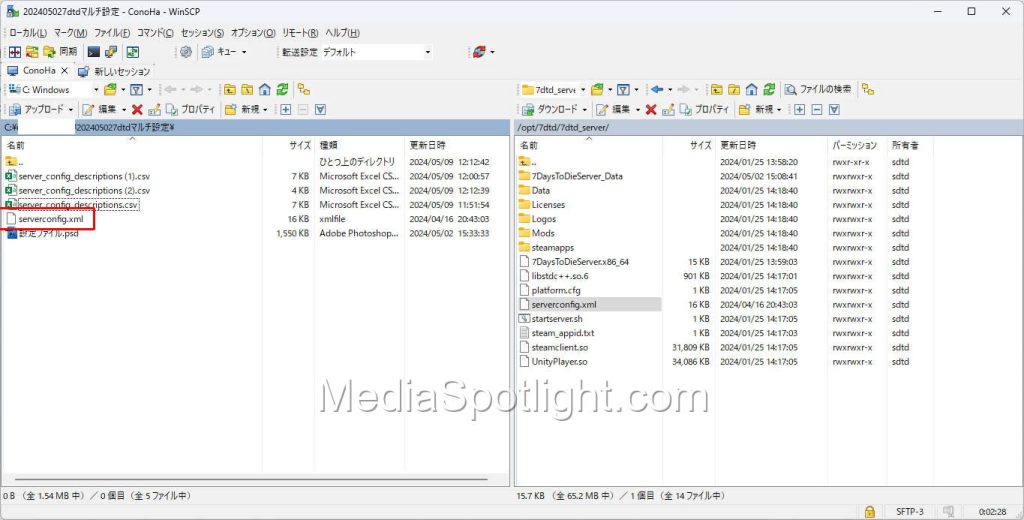
メニューからダウンロードをクリックすることで、画面左側のローカルPCのディレクトリにダウンロードすることができます。
ダウンロードされたらファイルをテキストエディタで編集してください。
\ Conohaで7Days to Dieのマルチプレイを始める! /
serverconfig.xmlをアップロードする
WinSCPの画面右側のサーバーディレクトリが/opt/7dtd/7dtd_serverになっていることを確認します。
編集が終わった画面左側のserverconfig.xmlを右クリックします。
メニューからアップロードをクリックします。
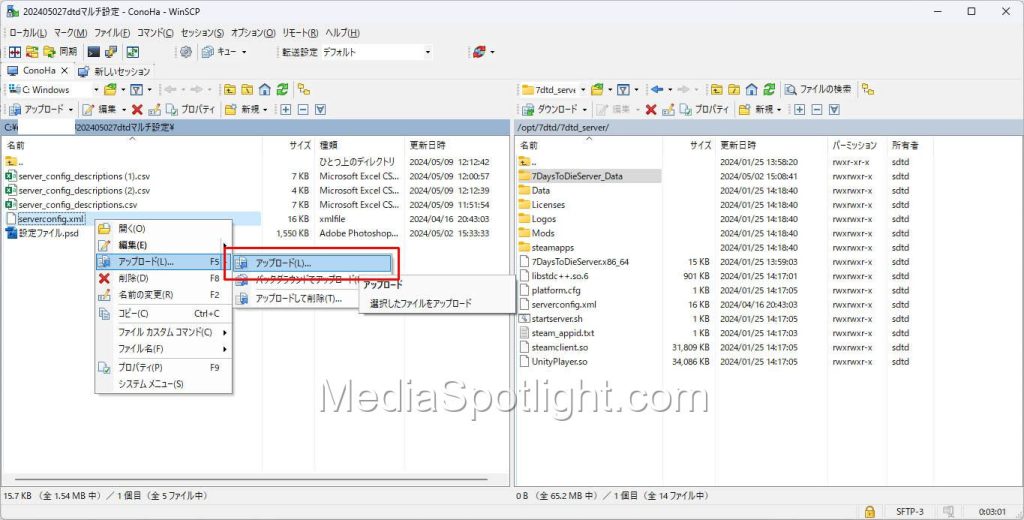
これで設定ファイルの更新が完了します。
\ Conohaで7Days to Dieのマルチプレイを始める! /
serverconfig.xmlファイルの設定値の構成は?
設定値の構成
設定を編集する際には以下のような形式になります。
xmlCopy code<property name="ExampleMode" value="1"/> <!-- 1 = Easy, 2 = Normal, 3 = Hard -->property nameは編集する設定の名前を指します。これは自己説明的で、ほとんどの場合変更する必要はありません。valueは編集する設定の値で、数字、真偽値(true/false)、または文字列の形式になります。- 各行の右端にあるコメントでは、目的の設定を達成するために入力する必要がある値のタイプが説明されています。この例では、値「1」はイージーモードを有効にし、「2」はノーマルモード、「3」はハードモードを有効にします。
設定ファイルの内容は?
以下がserverconfig.xmlファイルの全設定値の内容となります。
<?xml version="1.0"?>
<ServerSettings>
	<!-- GENERAL SERVER SETTINGS -->

	<!-- Server representation -->
	<property name="ServerName"						value="My Game Host"/>		<!-- Whatever you want the name of the server to be. -->
	<property name="ServerDescription"				value="A 7 Days to Die server"/>	<!-- Whatever you want the server description to be, will be shown in the server browser. -->
	<property name="ServerWebsiteURL"				value=""/>					<!-- Website URL for the server, will be shown in the serverbrowser as a clickable link -->
	<property name="ServerPassword"					value="JxjuDvGhJy"/>					<!-- Password to gain entry to the server -->
	<property name="ServerLoginConfirmationText"	value="" />					<!-- If set the user will see the message during joining the server and has to confirm it before continuing. For more complex changes to this window you can change the "serverjoinrulesdialog" window in XUi -->
	<property name="Region"							value="NorthAmericaEast" />	<!-- The region this server is in. Values: NorthAmericaEast, NorthAmericaWest, CentralAmerica, SouthAmerica, Europe, Russia, Asia, MiddleEast, Africa, Oceania -->
	<property name="Language"						value="English" />			<!-- Primary language for players on this server. Values: Use any language name that you would users expect to search for. Should be the English name of the language, e.g. not "Deutsch" but "German" -->

	<!-- Networking -->
	<property name="ServerPort"						value="26900"/>				<!-- Port you want the server to listen on. Keep it in the ranges 26900 to 26905 or 27015 to 27020 if you want PCs on the same LAN to find it as a LAN server. -->
	<property name="ServerVisibility"				value="1"/>					<!-- Visibility of this server: 2 = public, 1 = only shown to friends, 0 = not listed. As you are never friend of a dedicated server setting this to "1" will only work when the first player connects manually by IP. -->
	<property name="ServerDisabledNetworkProtocols"	value="SteamNetworking"/>	<!-- Networking protocols that should not be used. Separated by comma. Possible values: LiteNetLib, SteamNetworking. Dedicated servers should disable SteamNetworking if there is no NAT router in between your users and the server or when port-forwarding is set up correctly -->
	<property name="ServerMaxWorldTransferSpeedKiBs" value="512"/>				<!-- Maximum (!) speed in kiB/s the world is transferred at to a client on first connect if it does not have the world yet. Maximum is about 1300 kiB/s, even if you set a higher value. -->

	<!-- Slots -->
	<property name="ServerMaxPlayerCount"			value="8"/>					<!-- Maximum Concurrent Players -->
	<property name="ServerReservedSlots"			value="0"/>					<!-- Out of the MaxPlayerCount this many slots can only be used by players with a specific permission level -->
	<property name="ServerReservedSlotsPermission"	value="100"/>				<!-- Required permission level to use reserved slots above -->
	<property name="ServerAdminSlots"				value="0"/>					<!-- This many admins can still join even if the server has reached MaxPlayerCount -->
	<property name="ServerAdminSlotsPermission"		value="0"/>					<!-- Required permission level to use the admin slots above -->

	<!-- Admin interfaces -->
	<property name="WebDashboardEnabled"			value="false"/>				<!-- Enable/disable the web dashboard -->
	<property name="WebDashboardPort"				value="8080"/>				<!-- Port of the web dashboard -->
	<property name="WebDashboardUrl"				value=""/>					<!-- External URL to the web dashboard if not just using the public IP of the server, e.g. if the web dashboard is behind a reverse proxy. Needs to be the full URL, like "https://domainOfReverseProxy.tld:1234/". Can be left empty if directly using the public IP and dashboard port -->
	<property name="EnableMapRendering"				value="false"/>				<!-- Enable/disable rendering of the map to tile images while exploring it. This is used e.g. by the web dashboard to display a view of the map. -->

	<property name="TelnetEnabled"					value="false"/>				<!-- Enable/Disable the telnet -->
	<property name="TelnetPort"						value="8081"/>				<!-- Port of the telnet server -->
	<property name="TelnetPassword"					value=""/>					<!-- Password to gain entry to telnet interface. If no password is set the server will only listen on the local loopback interface -->
	<property name="TelnetFailedLoginLimit"			value="10"/>				<!-- After this many wrong passwords from a single remote client the client will be blocked from connecting to the Telnet interface -->
	<property name="TelnetFailedLoginsBlocktime"	value="10"/>				<!-- How long will the block persist (in seconds) -->

	<property name="TerminalWindowEnabled"			value="true"/>				<!-- Show a terminal window for log output / command input (Windows only) -->

	<!-- Folder and file locations -->
	<property name="AdminFileName"					value="serveradmin.xml"/>	<!-- Server admin file name. Path relative to the SaveGameFolder -->
	<!-- <property name="UserDataFolder"				value="absolute path" /> -->	<!-- Use this to override where the server stores all generated data, including RWG generated worlds. Do not forget to uncomment the entry! -->
	<!-- <property name="SaveGameFolder"				value="absolute path" /> -->	<!-- Use this to only override the save game path. Do not forget to uncomment the entry! -->

	<!-- Other technical settings -->
	<property name="EACEnabled"						value="true"/>				<!-- Enables/Disables EasyAntiCheat -->
	<property name="HideCommandExecutionLog"		value="0"/>					<!-- Hide logging of command execution. 0 = show everything, 1 = hide only from Telnet/ControlPanel, 2 = also hide from remote game clients, 3 = hide everything -->
	<property name="MaxUncoveredMapChunksPerPlayer"	value="131072"/>			<!-- Override how many chunks can be uncovered on the ingame map by each player. Resulting max map file size limit per player is (x * 512 Bytes), uncovered area is (x * 256 m²). Default 131072 means max 32 km² can be uncovered at any time -->
	<property name="PersistentPlayerProfiles"		value="false" />			<!-- If disabled a player can join with any selected profile. If true they will join with the last profile they joined with -->


	<!-- GAMEPLAY -->

	<!-- World -->
	<property name="GameWorld"						value="Navezgane"/>			<!-- "RWG" (see WorldGenSeed and WorldGenSize options below) or any already existing world name in the Worlds folder (currently shipping with e.g. "Navezgane", "PREGEN01", ...) -->
	<property name="WorldGenSeed"					value="KmCrj8gM"/>				<!-- If RWG this is the seed for the generation of the new world. If a world with the resulting name already exists it will simply load it -->
	<property name="WorldGenSize"					value="6144"/>				<!-- If RWG, this controls the width and height of the created world. Officially supported sizes are between 6144 and 10240 and must be a multiple of 2048, e.g. 6144, 8192, 10240. -->
	<property name="GameName"						value="My Game"/>			<!-- Whatever you want the game name to be. This affects the save game name as well as the seed used when placing decoration (trees etc) in the world. It does not control the generic layout of the world if creating an RWG world -->
	<property name="GameMode"						value="GameModeSurvival"/>	<!-- GameModeSurvival -->

	<!-- Difficulty -->
	<property name="GameDifficulty"					value="2"/>					<!-- 0 - 5, 0=easiest, 5=hardest -->
	<property name="BlockDamagePlayer"				value="100" />				<!-- How much damage do players to blocks (percentage in whole numbers) -->
	<property name="BlockDamageAI"					value="100" />				<!-- How much damage do AIs to blocks (percentage in whole numbers) -->
	<property name="BlockDamageAIBM"				value="100" />				<!-- How much damage do AIs during blood moons to blocks (percentage in whole numbers) -->
	<property name="XPMultiplier"					value="100" />				<!-- XP gain multiplier (percentage in whole numbers) -->
	<property name="PlayerSafeZoneLevel"			value="5" />				<!-- If a player is less or equal this level he will create a safe zone (no enemies) when spawned -->
	<property name="PlayerSafeZoneHours"			value="5" />				<!-- Hours in world time this safe zone exists -->

	<!--  -->
	<property name="BuildCreate"					value="false" />			<!-- cheat mode on/off -->
	<property name="DayNightLength"					value="60" />				<!-- real time minutes per in game day: 60 minutes -->
	<property name="DayLightLength"					value="18" />				<!-- in game hours the sun shines per day: 18 hours day light per in game day -->
	<property name="DropOnDeath"					value="1" />				<!-- 0 = nothing, 1 = everything, 2 = toolbelt only, 3 = backpack only, 4 = delete all -->
	<property name="DropOnQuit"						value="0" />				<!-- 0 = nothing, 1 = everything, 2 = toolbelt only, 3 = backpack only -->
	<property name="BedrollDeadZoneSize"			value="15" />				<!-- Size (box "radius", so a box with 2 times the given value for each side's length) of bedroll deadzone, no zombies will spawn inside this area, and any cleared sleeper volumes that touch a bedroll deadzone will not spawn after they've been cleared. -->
	<property name="BedrollExpiryTime"				value="45" />				<!-- Number of real world days a bedroll stays active after owner was last online -->
	<property name="AllowSpawnNearBackpack"			value="false"/>				<!-- Allow players to respawn near their last dropped backpack when they die -->

	<!-- Performance related -->
	<property name="MaxSpawnedZombies"				value="64" />				<!-- This setting covers the entire map. There can only be this many zombies on the entire map at one time. Changing this setting has a huge impact on performance. -->
	<property name="MaxSpawnedAnimals"				value="50" />				<!-- If your server has a large number of players you can increase this limit to add more wildlife. Animals don't consume as much CPU as zombies. NOTE: That this doesn't cause more animals to spawn arbitrarily: The biome spawning system only spawns a certain number of animals in a given area, but if you have lots of players that are all spread out then you may be hitting the limit and can increase it. -->
	<property name="ServerMaxAllowedViewDistance"	value="12" />				<!-- Max viewdistance a client may request (6 - 12). High impact on memory usage and performance. -->
	<property name="MaxQueuedMeshLayers"			value="1000" />			<!-- Maximum amount of Chunk mesh layers that can be enqueued during mesh generation. Reducing this will improve memory usage but may increase Chunk generation time -->

	<!-- Zombie settings -->
	<property name="EnemySpawnMode"					value="true" />				<!-- Enable/Disable enemy spawning -->
	<property name="EnemyDifficulty"				value="0" />				<!-- 0 = Normal, 1 = Feral -->
	<property name="ZombieFeralSense"				value="0" />				<!-- 0-3 (Off, Day, Night, All) -->
	<property name="ZombieMove"						value="0" />				<!-- 0-4 (walk, jog, run, sprint, nightmare) -->
	<property name="ZombieMoveNight"				value="3" />				<!-- 0-4 (walk, jog, run, sprint, nightmare) -->
	<property name="ZombieFeralMove"				value="3" />				<!-- 0-4 (walk, jog, run, sprint, nightmare) -->
	<property name="ZombieBMMove"					value="3" />				<!-- 0-4 (walk, jog, run, sprint, nightmare) -->
	<property name="BloodMoonFrequency"				value="7" />				<!-- What frequency (in days) should a blood moon take place. Set to "0" for no blood moons -->
	<property name="BloodMoonRange"					value="0" />				<!-- How many days can the actual blood moon day randomly deviate from the above setting. Setting this to 0 makes blood moons happen exactly each Nth day as specified in BloodMoonFrequency -->
	<property name="BloodMoonWarning"				value="8" />				<!-- The Hour number that the red day number begins on a blood moon day. Setting this to -1 makes the red never show.  -->
	<property name="BloodMoonEnemyCount"			value="8" />				<!-- This is the number of zombies that can be alive (spawned at the same time) at any time PER PLAYER during a blood moon horde, however, MaxSpawnedZombies overrides this number in multiplayer games. Also note that your game stage sets the max number of zombies PER PARTY. Low game stage values can result in lower number of zombies than the BloodMoonEnemyCount setting. Changing this setting has a huge impact on performance. -->

	<!-- Loot -->
	<property name="LootAbundance"					value="100" />				<!-- percentage in whole numbers -->
	<property name="LootRespawnDays"				value="7" />				<!-- days in whole numbers -->
	<property name="AirDropFrequency"				value="72"/>				<!-- How often airdrop occur in game-hours, 0 == never -->
	<property name="AirDropMarker"					value="true"/>				<!-- Sets if a marker is added to map/compass for air drops. -->

	<!-- Multiplayer -->
	<property name="PartySharedKillRange"			value="100"/>				<!-- The distance you must be within to receive party shared kill xp and quest party kill objective credit. -->
	<property name="PlayerKillingMode"				value="3" />				<!-- Player Killing Settings (0 = No Killing, 1 = Kill Allies Only, 2 = Kill Strangers Only, 3 = Kill Everyone) -->

	<!-- Land claim options -->
	<property name="LandClaimCount"					value="3"/>					<!-- Maximum allowed land claims per player. -->
	<property name="LandClaimSize"					value="41"/>				<!-- Size in blocks that is protected by a keystone -->
	<property name="LandClaimDeadZone"				value="30"/>				<!-- Keystones must be this many blocks apart (unless you are friends with the other player) -->
	<property name="LandClaimExpiryTime"			value="7"/>					<!-- The number of real world days a player can be offline before their claims expire and are no longer protected -->
	<property name="LandClaimDecayMode"				value="0"/>					<!-- Controls how offline players land claims decay. 0=Slow (Linear) , 1=Fast (Exponential), 2=None (Full protection until claim is expired). -->
	<property name="LandClaimOnlineDurabilityModifier"	value="4"/>				<!-- How much protected claim area block hardness is increased when a player is online. 0 means infinite (no damage will ever be taken). Default is 4x -->
	<property name="LandClaimOfflineDurabilityModifier"	value="4"/>				<!-- How much protected claim area block hardness is increased when a player is offline. 0 means infinite (no damage will ever be taken). Default is 4x -->
	<property name="LandClaimOfflineDelay"			value="0"/>					<!-- The number of minutes after a player logs out that the land claim area hardness transitions from online to offline. Default is 0 -->


	<property name="DynamicMeshEnabled"				value="true"/>				<!-- Is Dynamic Mesh system enabled -->
	<property name="DynamicMeshLandClaimOnly"		value="true"/>				<!-- Is Dynamic Mesh system only active in player LCB areas -->
	<property name="DynamicMeshLandClaimBuffer"		value="3"/>					<!-- Dynamic Mesh LCB chunk radius -->
	<property name="DynamicMeshMaxItemCache"		value="3"/>					<!-- How many items can be processed concurrently, higher values use more RAM -->

	<property name="TwitchServerPermission"			value="90"/>				<!-- Required permission level to use twitch integration on the server -->
	<property name="TwitchBloodMoonAllowed"			value="false"/>				<!-- If the server allows twitch actions during a blood moon. This could cause server lag with extra zombies being spawned during blood moon. -->

	<property name="MaxChunkAge"					value="-1"/>				<!-- The number of in-game days which must pass since visiting a chunk before it will reset to its original state if not revisited or protected (e.g. by a land claim or bedroll being in close proximity). -->
	<property name="SaveDataLimit"					value="-1"/>				<!-- The maximum disk space allowance for each saved game in megabytes (MB). Saved chunks may be forceably reset to their original states to free up space when this limit is reached. Negative values disable the limit. -->

	<!-- There are several game settings that you cannot change when starting a new game.
	You can use console commands to change at least some of them ingame.
	setgamepref BedrollDeadZoneSize 30 -->
</ServerSettings>
各設定値項目の内容の説明については現在執筆中です。
\ Conohaで7Days to Dieのマルチプレイを始める! /
7Days to Dieをマルチプレイで楽しむには?
7Days to Dieはマルチプレイに対応しており、サーバーを用意することでPvPやPvEコンテンツとして楽しむことができます。

友達とワイワイマルチプレイしてみたいけど、自分のPCだとスペックが足りない…

マルチプレイサーバー立てるのってインストールや設定が難しそう…
そんな時におすすめなのがConoHa for GAMEです。
ConoHa for GAMEはインターネット大手GMOが提供するゲームのマルチプレイに特化したレンタルサーバーです。

ConoHa for GAMEなら7Days to Dieのテンプレートイメージが用意されてて自動インストールできるから初心者でも安心!
Palworldやマインクラフト、有名VTuberなどが参加するストグラで使用されるGTA5 FiveMなどでも多く利用されています。
- 自動インストール機能があるため専門知識不要で契約後すぐに7Days to Dieマルチプレイできる
- 圧倒的に高性能なサーバー
- 安心のサポート体制
料金はゲームのマルチプレイ用サーバーとして使用する場合は4GB以上のプランが推奨で月額3,969円からとなっており、頻繁にセールをやっていますので非常に安価な費用でマルチプレイを始めることができます。
使いやすさではConoHa for GAMEが圧倒的に好評!
7Dasy to Dieの自動インストール機能で初心者でもすぐにマルチプレイ可能!
マルチプレイをこれから始めてみたいと思っている初心者の方に最適なレンタルサーバーです。
私自身もConoHa for GAMEを使用していますが、契約から7Dasy to Dieのインストールまで30分ほどで完了してすぐにマルチプレイできました。
7Days to Dieをマルチプレイでワイワイ遊んでみたいと思っている方は、ぜひ活用してみてください。
\ 今すぐ7Days to Dieのマルチプレイを始める! /
まとめ
今回はConoHa for Gameで7Days to Dieのマルチプレイサーバーのゲームのマルチプレイに関する設定を変更する手順について解説しました。
マルチプレイサーバーの運用スタイルに合った設定を試してみてください。
また、当サイト内で公開している7Days to Dieの攻略・設定などに関する記事を以下のページでまとめていますので、あわせてご覧ください。
それでは、また次の記事でお会いしましょう。


コメント